3.6 Tasks as Entry Points

After the required pages are defined, the definition of a so-called Task is necessary. Tasks fulfill different functions in CBA ItemBuilder projects. Most importantly, tasks are the entry points to an item for the Preview (see section 1.4) and when the item is used in a test assembly (see chapter 7).
As an entry point, the Task specifies which page should be used as Start Page, and if specified in the Layout Settings, which xPage should be used as Start xPage. By defining one of the existing pages as the Start Page, the Task also specifies the page type of page. Beyond this function, Tasks are also used to structure scoring within CBA ItemBuilder projects. Since existing pages and item content can be used differently in different tasks, scoring rules are defined per task (see chapter 5 for details about the scoring of CBA ItemBuilder tasks).
3.6.1 Task Definition in the Tasks-View
The necessary steps and an overview of the central options to configure tasks are described in the following. Using the menu Project > Browse Tasks or with the toolbar icon ![]() , the Tasks View in the right panel of the CBA ItemBuilder can be opened. If no task is defined yet, it should look as shown in Figure 3.52.
, the Tasks View in the right panel of the CBA ItemBuilder can be opened. If no task is defined yet, it should look as shown in Figure 3.52.
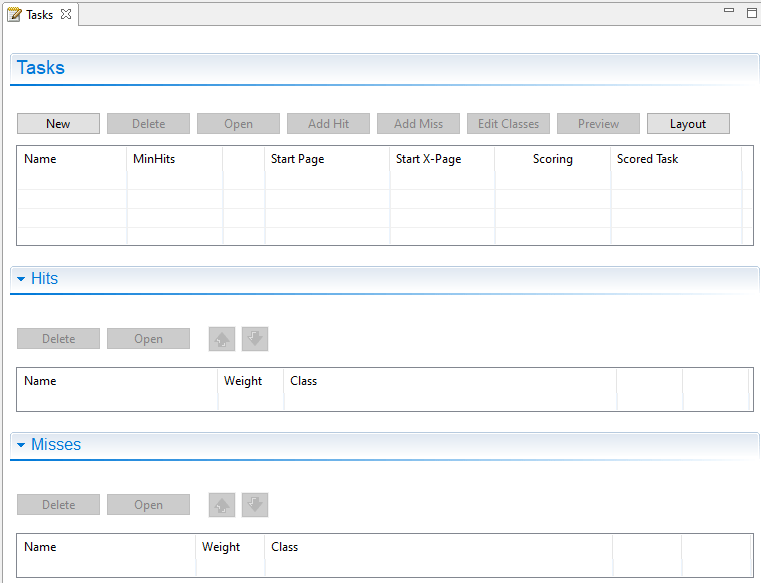
FIGURE 3.52: Empty Tasks - view of the CBA ItemBuilder.
A new Task can be created with the New button and existing Tasks can be edited in the Tasks editor by changing the entries in the particular row. The button Delete removes the Task in the row selected in the Tasks editor.
Task Name: After creating a new task via the New button, the default task name can be changed in the first column (Name). Task names can only contain selected characters: Letters, digits and underscores are allowed and the task name must start with a letter.42
MinHits: The minimum number of hits (default 1) can be entered in the second column (MinHits) and a positive number is expected.
First Page: Each task must define the first page (i.e., the page that is loaded first, when the task is shown). To define the first page, select an existing page from the list of pages. A completely defined task (with the name Task01 and the start page page) should look as shown in Figure 3.53.
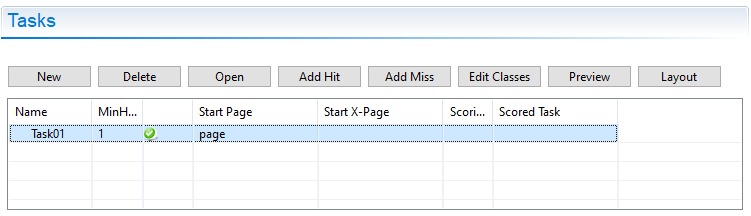
FIGURE 3.53: Tasks - view showing a complete Task-definition.
The green symbol ![]() in Figure 3.53 indicates that the task definition is correct and that the specified page is part of the current project. A red symbol would be shown in case of a mis-configuration.43
in Figure 3.53 indicates that the task definition is correct and that the specified page is part of the current project. A red symbol would be shown in case of a mis-configuration.43
If multiple Tasks are defined, the order of Tasks can be adjusted using the buttons ![]() and
and ![]() .
.
Task Initialization: Only for the implementation of items with dynamic content (see chapter 4) settings can be prepared for the logic layer of the CBA ItemBuilder using a syntax language (see 4.1). If this is necessary, syntax for the Task Initialization can be defined using the button Open. Afterwards an editor for the currently selected task will open to enter syntax for the Task Initialization. Details on this syntax and on using the Task Initialization can be found in the 4.5 subsection in chapter 4.
Task Scoring: The three buttons Add Hit, Add Miss and Edit Classes are provided for defining the scoring for a selected task. The defined hit and miss conditions are then displayed in the Tasks-view. Further information about the scoring capabilities of the CBA ItemBuilder can be found in chapter 5.
The remaining two buttons serve the following functions: With Preview the preview can be started for the currently selected task (see 1.4 for details). The Layout button can be used to set the layout for defined tasks (see section 3.6.2 below).
[Issue 6]
3.6.2 Layout Settings for Tasks
A layout can be defined for each defined task. If the layout setting is not changed for a particular task, only one page is displayed at a time by default. The dialog Execution layout settings (see Figure 3.54) can be opened in the Tasks-view using the button Layout. If multiple tasks are defined in a CBA ItemBuilder project, the settings are applied for the task selected in the list of task in the left part of the dialog.
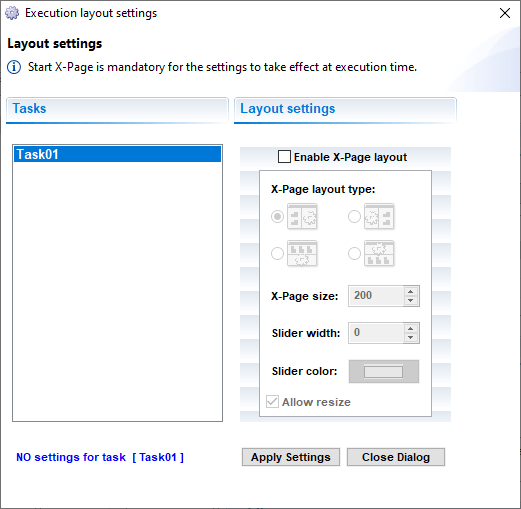
FIGURE 3.54: Dialog Execution layout settings to define xPage-layouts.
To save the changes, the Apply Settings button must be clicked before closing the dialog.
xPage Layout: The so-called xPage Layout can be activated using the dialog Layout setting (see Figure 3.54).
As shown in Figure 3.54, the xPage Layout allows to specify the xPage layout for a task using a checkbox. xPage layouts are always composed of a page and an xPage. The different layout types differ regarding the arrangement of these two components. Relative to the regular page the xPage can be left or right (Horizontal xPage Layout), top or bottom (Vertical xPage Layout). For Horizontal xPage Layout the property xPage size refers to the width of the xPage (full height as defined in the CBA Presentation Size), while for the Vertical xPage Layout the xPage size refers to the height of the xPage (full width as defined in the CBA Presentation Size).
The default size of the xPage Area can be changed at runtime during test taking if the Allow resize option is enabled. To make this possibility visible, a slider can be defined by setting a non-zero value for the ‘Slider width’ property. Finally, for visible sliders, the color can also be selected in the Slider color field.
Figure 3.55 shows an Horizontal xPage Layout with activated Allow resize-property. As can be seen in the example, scrollbars appear when the xPage (here left) or the Simple Page (here right) is larger than the visible area. By moving the Slider the visible size of the two pages can be changed. As you can see in the example, the size setting is retained when, for example, buttons are used to link to another page (see 3.11.4 for more details on using Links in combination with xPages). Table 3.5 summarizes all settings implemented in the CBA ItemBuilder for xPage-layouts. Table 3.5 summarizes the possible settings of the dialog Layout setting shown in Figure 3.54.
| Setting | Description |
|---|---|
| Enable xPage layout | Checkbox to enable the xPage layout for the selected task. |
| Horizontal xPage layout | Arrangement of the pages in the xPage layout (left: |
| Vertical xPage layout | Arrangement of the pages in the xPage layout (top: |
| xPage size | Size of the xPage (width for type left and right, height for type top and bottom). |
| Slider width | Size of the slider, if Allow resize is selected. |
| Slider color | Color of the slider, if the slider size is different from zero. |
| Allow resize | Allow to resize the xPage during runtime. Scrollbars will appear, as soon as the available space is smaller than the size of the Frame. |
CBA Presentation Size in Detail: The CBA Presentation Size defines the space on screen, that is used either for a single page or the combination of two pages (xPage-Layout). The item size for new Project Files is defined in the dialog Preferences (see section 3.2.2). Once a Project File is created, the item size is part of the Global Properties of that project. To edit the Global Properties, right-click on the project name and select Global Properties as shown in the Figure 3.56.
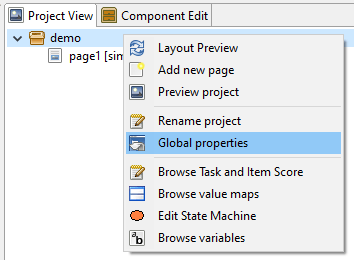
FIGURE 3.56: Entry Global Properties in the Context Menu of the project name in the Project View.
The entry Global Properties allows to edit the Project Settings, including the item size (Presentation height and Presentation width) for an existing CBA ItemBuilder Project File (see Figure 3.57).
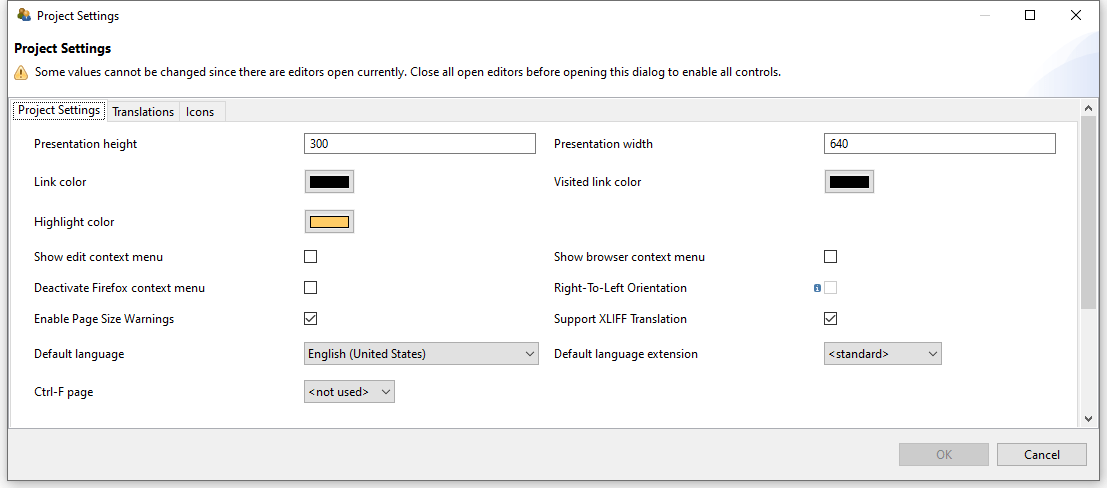
FIGURE 3.57: Project Settings to change the CBA Presentation Size.
The CBA Presentation Size and the size of pages defined as Width and Height property of the top-level container used as frame (see section 3.5.1) must fit each other so that no scrollbars appear. The critical factor here is whether an xPage Layout has been defined.
- No xPage Layout: The required size of an item results from the width of the
Frameand theBorder Widthof theFrame. Accordingly, the CBA Presentation Size must match the Frame Size plus two times theBorder Widthto avoid scrollbars (see upper part of Figure 3.58).
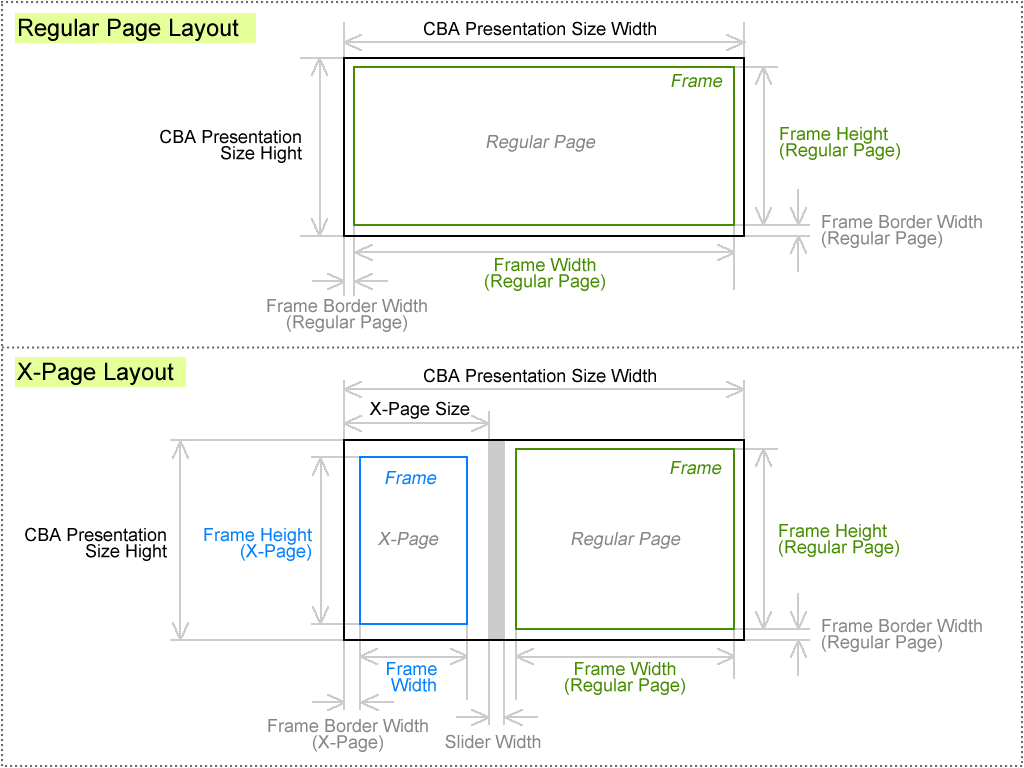
FIGURE 3.58: Schema for components of the CBA Presentation Size.
- xPage Layout: If an xPage layout is enabled, then the CBA Presentation Size must be sufficient to span the
Frameof the regular page and theFrameof the xPage. In addition, two times theBorder Widthof the page, two times theBorder Widthof the xPage and the width of the slider (ifAllow resizeis selected) must be taken into account (see lower part in Figure 3.58).
Frame plus two times the width of the border (Border Width property of the Frame).
If a non-zero width of the slider (Slider width, see Figure 3.54) is set in an xPage layout, then the available size for the regular page is reduced.