6.8 (More) Efficient use CBA ItemBuilder

The CBA ItemBuilder is a complex tool for designing interactive assessment components. The features described below and hints on how to use the CBA ItemBuilder can help to work efficiently with this tool.
6.8.1 Window Management
Section 3.1 describes the user interface of the CBA ItemBuilder in the default configuration (i.e., after a fresh installation). The arrangement of views in the three columns of the CBA Item Builder’s user interface can be adjusted and configured according to the user’s needs (and the available space on the screen). The video included in the item in Figure 6.38 shows how to customize the user interface of the CBA ItemBuilder.
6.8.2 Available Fonts and Font-List
Assessment content created with CBA ItemBuilder is used in a web browser at runtime. Accordingly, only fonts available for display in the web browser should be used.
Web Safe Fonts: Fonts that should be available in all browsers and result in similar renderings are called Web Safe Fonts. The following fonts are typically considered to be web safe:
- Arial (sans-serif)
- Verdana (sans-serif)
- Tahoma (sans-serif)
- Trebuchet MS (sans-serif)
- Times New Roman (serif)
- Georgia (serif)
- Garamond (serif)
- Courier New (monospace)
- Brush Script MT (cursive)
Font List: The CBA ItemBuilder uses the fonts registered on the system and therefore offers quite many fonts (e.g., in the editors for TextFields, HTMLTextFields and in the Appearance tab of the Properties view). This (usually) long font list should be reduced to the fonts that are planned to be used (i.e., Web Safe Fonts and similar fonts across several items). Since the item contents created with the CBA ItemBuilder are rendered in the browser, it must also be taken into account when selecting the fonts that these must then be available on the target system.
To reduce the list of fonts available in the CBA ItemBuilder to design items, the list of CBA Item Fonts can be configured (see Figure 6.39) in the section CBA Item Fonts in the Preferences (menu Utilities > Preference).
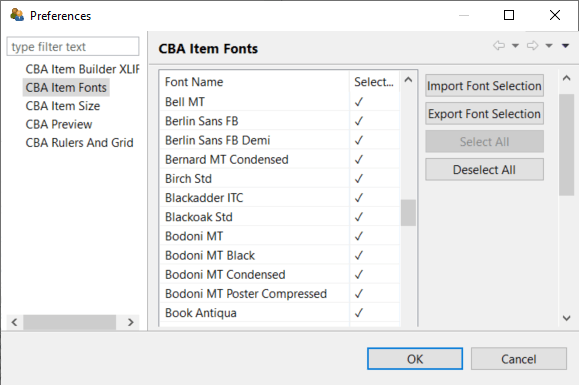
FIGURE 6.39: ‘CBA Item Fonts’ setting of the CBA ItemBuilder.
To adjust the list first remove the selection in this list using the Deselect All button and then select the fonts you want to use by clicking on them. You can also export (Export Font Selection) and import (Import Font Selection) fonts if you want to use different fonts for different projects or assessments.
6.8.3 Color Codes
The same selection dialog is always used to define color in different editors of the CBA ItemBuilder. Colors can be chosen from a selection of example colors or defined precisely in different formats (HSV, HSL, RGB, and CMYK, see Figure 6.40).
Save Selected Colors: To avoid entering identical color values multiple times, the dialog shown in Figure 6.40 also allows to Add a color to the user-defined buttons of Recent colors.
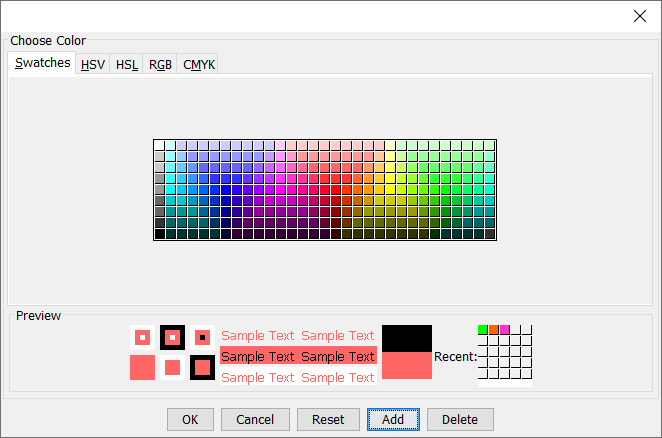
FIGURE 6.40: Color selector (Choose Color) of the CBA ItemBuilder allows storing Recent-colors.
Colors in the Properties View: The CBA ItemBuilder uses a color representation in the tab Core of the Properties view as decimal numbers (e.g., white is represented by DEC -1, corresponding to hex #FFFFFF, black is represented by DEC -16777216, corresponding to hex #000000). The item shown in Figure 6.41 contains via an ExternalPageFrame an example of JavaScript functions to convert the decimal colors of the CBA ItemBuilder into other formats.
6.8.4 Error Messages
When using the CBA ItemBuilder, especially when calling the Preview and saving Project Files, error messages are displayed if the created assessment content is inconsistent. While this might be confusing when using the CBA ItemBuilder for the first time, the error messages typically give precise information on where to find the inconsistency. The item shown in Figure 6.42 allows searching for error messages and provides additional tips on fixing the issues.
6.8.5 Hints for Designing Interactive Items
The CBA ItemBuilder gives item authors a wide range of freedom in designing assessment components. Some hints are compiled below to ensure that the resulting items work well (and look good, if possible).
Visual Overlapping Components: The CBA ItemBuilder allows to place elements freely using X and Y coordinates within containers (i.e., Frames, Panels etc., see Page Editor in section 3.1.3), and each component has a size defined as Width and Height. The item authors’ responsibility is to ensure that the components created and designed in the Page Editor are displayed appropriately (i.e., in a meaningful order).
Z-Order: If multiple components are defined on a page, they are displayed in a specific order. This order can be called the Z-Order (i.e., besides X and Y for horizontal and vertical placement, the Z-Order defines the order concerning a third dimension, Z). In most use cases, item authors do not need to worry about the Z-Order any further since it essentially follows from the container principle (see section 2.11.4): The elements within a container (child elements) are always rendered on top of the containers itself (parent elements). The CBA ItemBuilder automatically applies this rule, together with an additional grouping of components within containers into meaningful layers.
The layers group components within containers by component type. Only for components in the same layer the order in which components are listed in the Component Edit view (i.e., the order in which components are created).73
Functioning Affected by Overlapping Components: Although the CBA ItemBuilder approach of avoiding user-defined Z-Orders by applying heuristics based on layers was proven to be useful over the last years, item authors should be aware of the issue that overlapping components can result in a particular functioning. If, for instance, an HTMLTextField is placed so that it entirely or partially covers a Button (see Figure 6.43 for an example), the functioning of the Button might result in unexpected behavior. The same is true for various other components. If something overlaps with SingleLineInputFields, it can become difficult or even impossible to enter any text into the SingleLineInputField. Therefore, when designing assessment components, ensure that the components do not overlap or only overlap sensibly.
The difference between the Visual Z-Order and the Interactions Z-Order can be seen in Figure 6.43.
The left side in Figure 6.43 shows a screenshot of the design time from the Page Editor. HTMLTextField 1 is shown below the button, overlaid by HTMLTextField 2. In the Preview and at Runtime, as shown on the right, the CBA ItemBuilder follows this structure regarding the filled background (white color) and the border (red color). But note that the text in HTMLTextField 1 is displayed above the Button. An identical rendering is also created by the CBA ItemBuilder for HTMLTextField 3, i.e. similarly the text overlays the SingleLineInputField, although the filled white background and the red border are rendered behind the SingleLineInputField.
Exploring the behavior (i.e. the Interactions Z-Order) in the item shown in Figure 6.43, we see that not only the text HTMLTextField 1 and HTMLTextField 3 overlay the underlying components Button and SingleLineInputField. Also, due to the overlapping of the components, the connected events are forwarded to Button and SingleLineInputField only at the points where no HTMLTextField is defined.
Scrollbars: When collecting diagnostic information (i.e., when assessment content is created with the CBA ItemBuilder), the necessity to scroll should be used as controlled as possible. Following this principle, assessment content created with the CBA ItemBuilder is designed for screen sizes (i.e., for an aspect ratio) called CBA Presentation Size (see section 3.2.2).
Scrollbars will automatically appear when pages are larger (in width and height) than the available space.74 The available space for simple pages (i.e., pages at the highest hierarchy level) is identical to the CBA Presentation Size, minus the space of an optionally configured X-Page (see section 3.4.2). Similarly, pages within PageAreas (see section 3.5.4) or TreeViewArea (see section 3.9.9) and Web Child Pages within a WebChildArea (see section 3.13.2) are always displayed with scrollbars if the width or height of the embedded exceeds the width or height of the corresponding area.
Widht and Height properties of the Frame.
Un-proportional Scaling of Images and Videos: Images and videos added as resources to CBA ItemBuilder projects have a native resolution, i.e., a size defined in pixels (height and width). For optimal display, images and videos should be added to CBA ItemBuilder items in the size they will be displayed by the corresponding component (see section X). The Page Editor allows resizing components to display image and video resources.
If images or videos are larger than they will be used during display, the resources will be unnecessarily large and may produce load times that could be avoided by scaling the resources before insertion. If images or videos are smaller than the area used for display, they are scaled up and may only be visibly blurred.
Standardize Page Layout Across Pages: Test takers typically see many individual pages during the processing of assessments created with the CBA ItemBuilder. It is recommended to standardize spacing, font, font size, formatting (font color, bold, italics), etc., as much as possible to ensure a consistent appearance for the test takers.
6.8.6 Export and import Pages
In order to use once-designed pages multiple times when designing multiple assessment components with the CBA ItemBuilder, multiple tasks can be defined within one project file (see Task Editor in section 3.1.4 and tips on the division of content to tasks in section 3.6.3). This approach is recommended if feasible, as it eliminates the need to make copies of pages.
If there are already designed and tested CBA ItemBuilder assessment components that already contain the required functionality, it can also be efficient to use them as templates. The CBA ItemBuilder provides the Save As feature, and the project name can be changed using the Rename Project function (see section 3.2.1). If this approach is chosen, potential changes that are made to the source file afterward must also be applied to the copy.
Export Page: If instead of an entire project file only a single page is to be moved or copied from one project to another, CBA ItemBuilder provides the option to export pages in the context menu (right-click on the project name) of the Project Tree (see Figure 6.44).
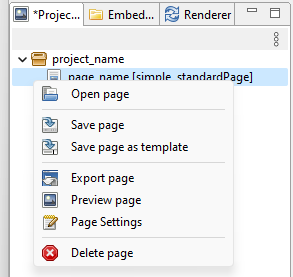
FIGURE 6.44: Context Menu in the Project Tree.
One page at a time can be exported and saved as a ZIP archive.
Import Page: Using the similar function Import Page, pages can be inserted into another CBA ItemBuilder Project File.
6.8.7 Working with Page-Templates
If pages are exported via the Export Pages function as in the past section 6.8.6, they are available as ZIP archives in the file system and can be copied, moved, and (for instance) sent as files or uploaded to versioning systems (see section 8.3.2).
If pages are to be used as templates on a computer (i.e., within one instance of the CBA ItemBuilder), the CBA ItemBuilder additionally provides the template functionality.
Save Page as Template: Using the context menu (right-click on the project name) of the Project Tree (see Figure 6.44, pages can also be stored as Template. Templates need a unique name (see Figure 6.45) and are stored inside of the CBA ItemBuilder.

FIGURE 6.45: Dialog to specify the name of a Template.
Create Page from Template: Pages saved as templates can then be used to create new pages within a CBA ItemBuilder Project File. The toolbar contains the icon ![]() for this purpose, and the function is also accessible via the context menu in the Project View.
for this purpose, and the function is also accessible via the context menu in the Project View.
Template Browser: Selecting and managing page templates is done in the Template Browser (see Figure 6.46). After entering a name for the new page to be created, a template can be used with Create Page. If Skip Preview is not selected, then the view from the Page Editor is displayed in the Template Preview area. Figure 6.46 shows that templates (analogous to pages) can also be exported or imported. The Delete Template button can be used to delete a template from the CBA ItemBuilder instance.
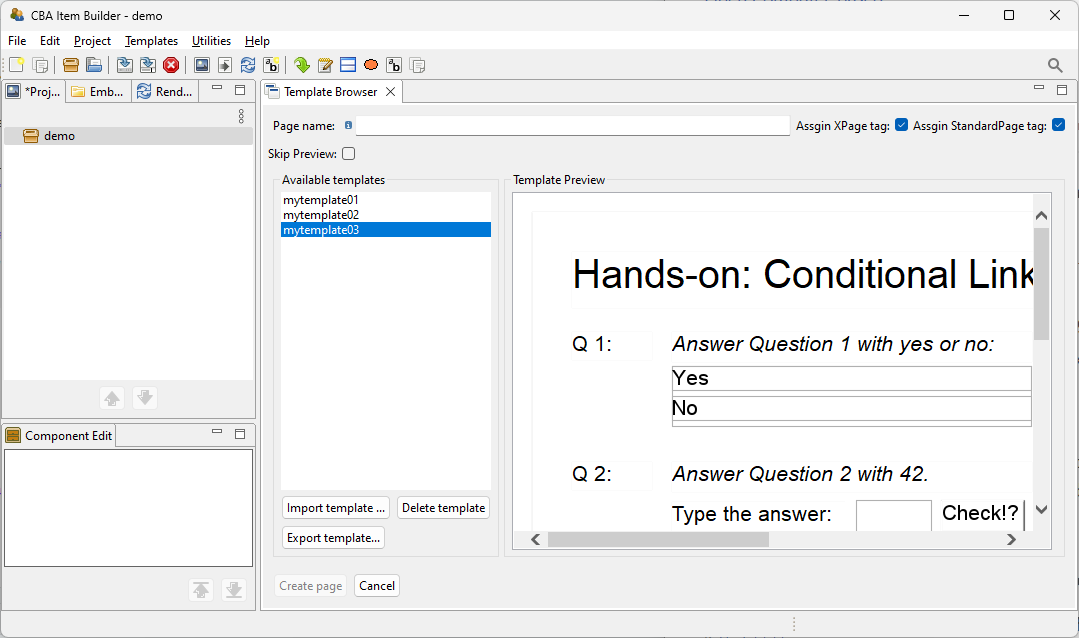
FIGURE 6.46: Dialog to specify the name of a Template.
When pages are created from templates, they can be flagged with the XPage and StandardPage tags.
6.8.8 How to run two CBA ItemBuilder Simultaneously
The CBA ItemBuilder is an application that can be started only once per installation. The underlying reason is that each CBA ItemBuilder installation (also referred to as instance in the following) has its dedicated workspace in which the contents of a CBA ItemBuilder Project File are unpacked during processing.
At the same time, when creating many (as uniform as possible) assessment components with CBA ItemBuilder, it can be helpful to have a Project File open to view implementations there while working on another project file in a second CBA ItemBuilder (see Figure 6.47 for an example).
Multiple Instances: The CBA ItemBuilder can be installed multiple times to run several instances in parallel. Each installation must have its own directory. In addition, a so-called port (i.e., a dedicated connection address on the computer on which CBA ItemBuilder is installed) must be different for each instance. Therefore, after installing a second CBA ItemBuilder or copying the entire program directory, a port configuration must be changed for one of the instances to be operated in parallel.
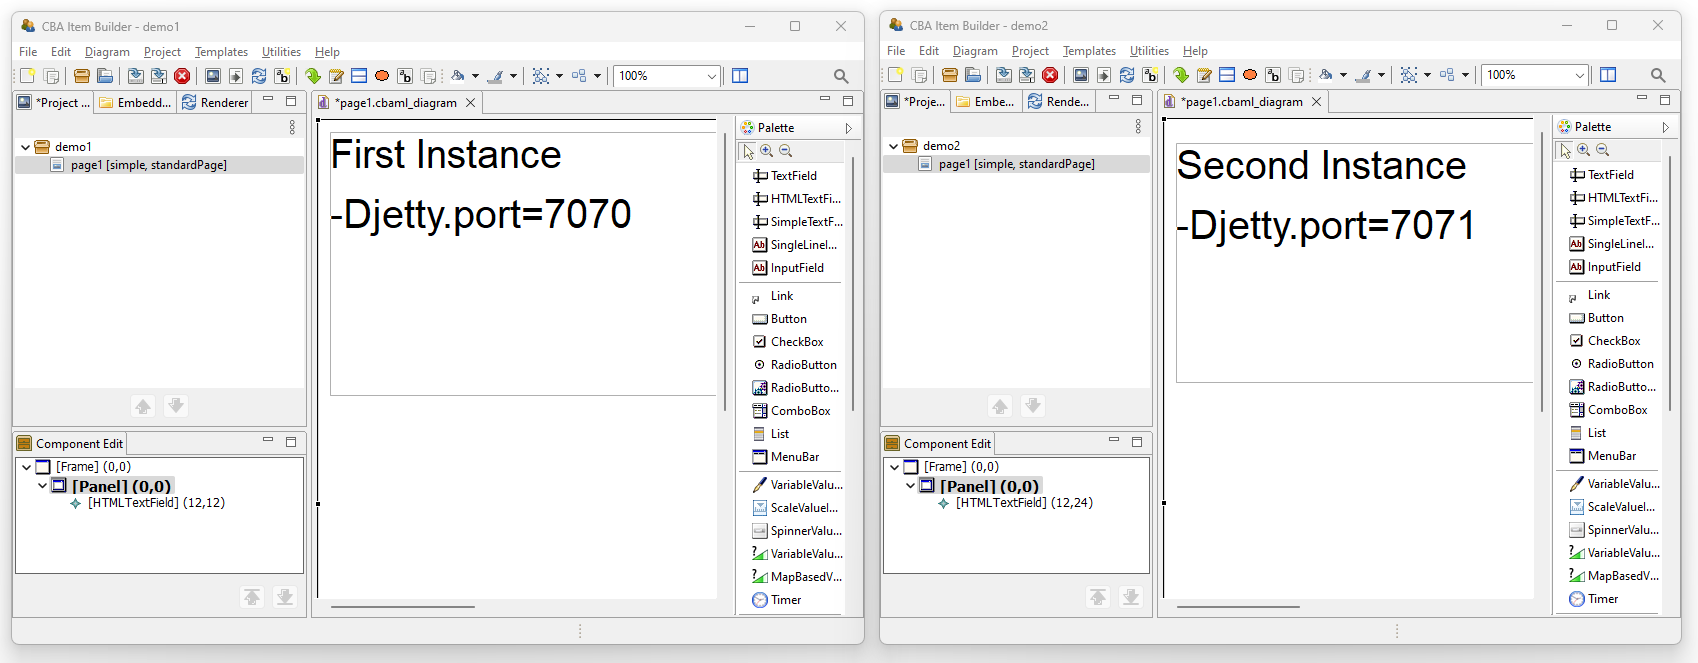
FIGURE 6.47: Example screen shot running two CBA ItemBuilder in parallel.
The following steps are necessary to manually enable the use of two instances of the CBA ItemBuilder:
Install the CBA ItemBuilder (if not yet done, as described in section 1.1).
Locate the program directory. By default this should be `C:/users/{UserName}/AppData/Local/CBA-IB-{Version}´
Duplicate the sub-directory
IB(i.e., create a copy of the directoryIBand rename it toIB2).Find the file
cba-itembuilder.iniin the duplicated folder (IB2) and open it with a text editor (e.g.,notepad).Change the number that is assigned to the
Djetty.portto a higher and different value, e.g.:
-Djetty.port=7072Save the file
cba-itembuilder.iniand close the editor.Create a new shortcut in Windows Explorer to the file
cba-itembuilder.exein the directoryIB2. Starting this application from the copied directory should now be possible in parallel to the application from the directoryIB.
Make sure you never open an identical CBA ItemBuilder Project File in two instances in parallel. The clipboard (see section 3.7.2) cannot work between different instances of CBA ItemBuilder, i.e., if something is copied in one instance, it cannot be pasted in another instance. To transfer content from one instance to another, the function to export and import pages is available (see section 6.8.6). Alternatively, to transfer content within an instance, the template function can be used (see section 6.8.7).